How to Take a Screenshot on Mac

1. Built‑in macOS methods (keyboard shortcuts + UI)
macOS includes a robust built‑in screenshot utility (from Mojave onward, and enhanced in later versions). Here are the main ways to use it:
| Shortcut | What it does | Notes |
|---|---|---|
⇧ + ⌘ + 3 |
Capture the entire screen(s) | Creates a PNG file on the desktop (or configured folder) |
⇧ + ⌘ + 4 |
Capture a selected area | After pressing, drag a rectangle; release to take screenshot |
⇧ + ⌘ + 4, then press Space |
Capture a window | Hover over the window (it highlights), then click |
⇧ + ⌘ + 5 |
Brings up the Screenshot UI | You can choose area/fullscreen/window, timer, options, and screen record |
⇧ + ⌘ + 6 (on Macs with Touch Bar) |
Capture the Touch Bar | Saves as an image to the usual location |
When you trigger one of these, macOS shows a thumbnail pop-over in the corner (for a few seconds). You can click it to crop, annotate, or share quickly.
The default behavior is to save the screenshot to the desktop as a .png file, named with “Screen Shot [date] at [time].png”. If you drag the thumbnail into a document or folder, it moves/copies the file.
You can also right-click (or control-click) in the thumbnail to get “Save to” or “Delete”.
2. How it works via Terminal (and behind the scenes)
Under the hood, macOS uses the screencapture and screenshot commands (depending on version) for the same functionality.
Here are some examples:
# Capture the whole screen and save to ~/Desktop/screen.png
screencapture ~/Desktop/screen.png

# Capture a selection interactively (you drag a region) and save
screencapture -i ~/Desktop/sel.png

# Capture a window (you click a window) with shadow
screencapture -iW ~/Desktop/window.png

# Capture after 5 seconds delay
screencapture -T 5 ~/Desktop/delayed.png

# Capture with screen recording (video) – newer macOS use `screenshot`:
screenshot video ~/Desktop/myrecording.mov
You can also change default screenshot settings via defaults commands:
# Change default save location
defaults write com.apple.screencapture location ~/Screenshots

# Change default image format (png, jpg, tiff, pdf, gif, bmp)
defaults write com.apple.screencapture type jpg

# Disable the thumbnail preview popover
defaults write com.apple.screencapture show-thumbnail -bool FALSE

# To apply changes (restart system UI server)
killall SystemUIServer
3. Limitations of the built‑in macOS screenshot tool
The built-in tool is convenient and well-integrated, but it has trade‑offs. Here are some of the limitations:
- Annotation & editing are limited
- No scrolling capture / stitching
- Sharing / cloud / links
- Limited video capture features
- No OCR (text extraction from images)
- No fancy backgrounds / “clean framing”
- No versioning / screenshot history
4. Comparison: Third-party screenshot / capture tools
Below I compare a selection of popular screenshot / capture tools for Mac, covering your requested categories: Price, Platforms, Public Link Sharing, Ease of Use, Customization, Supported Formats, Best Suited For.
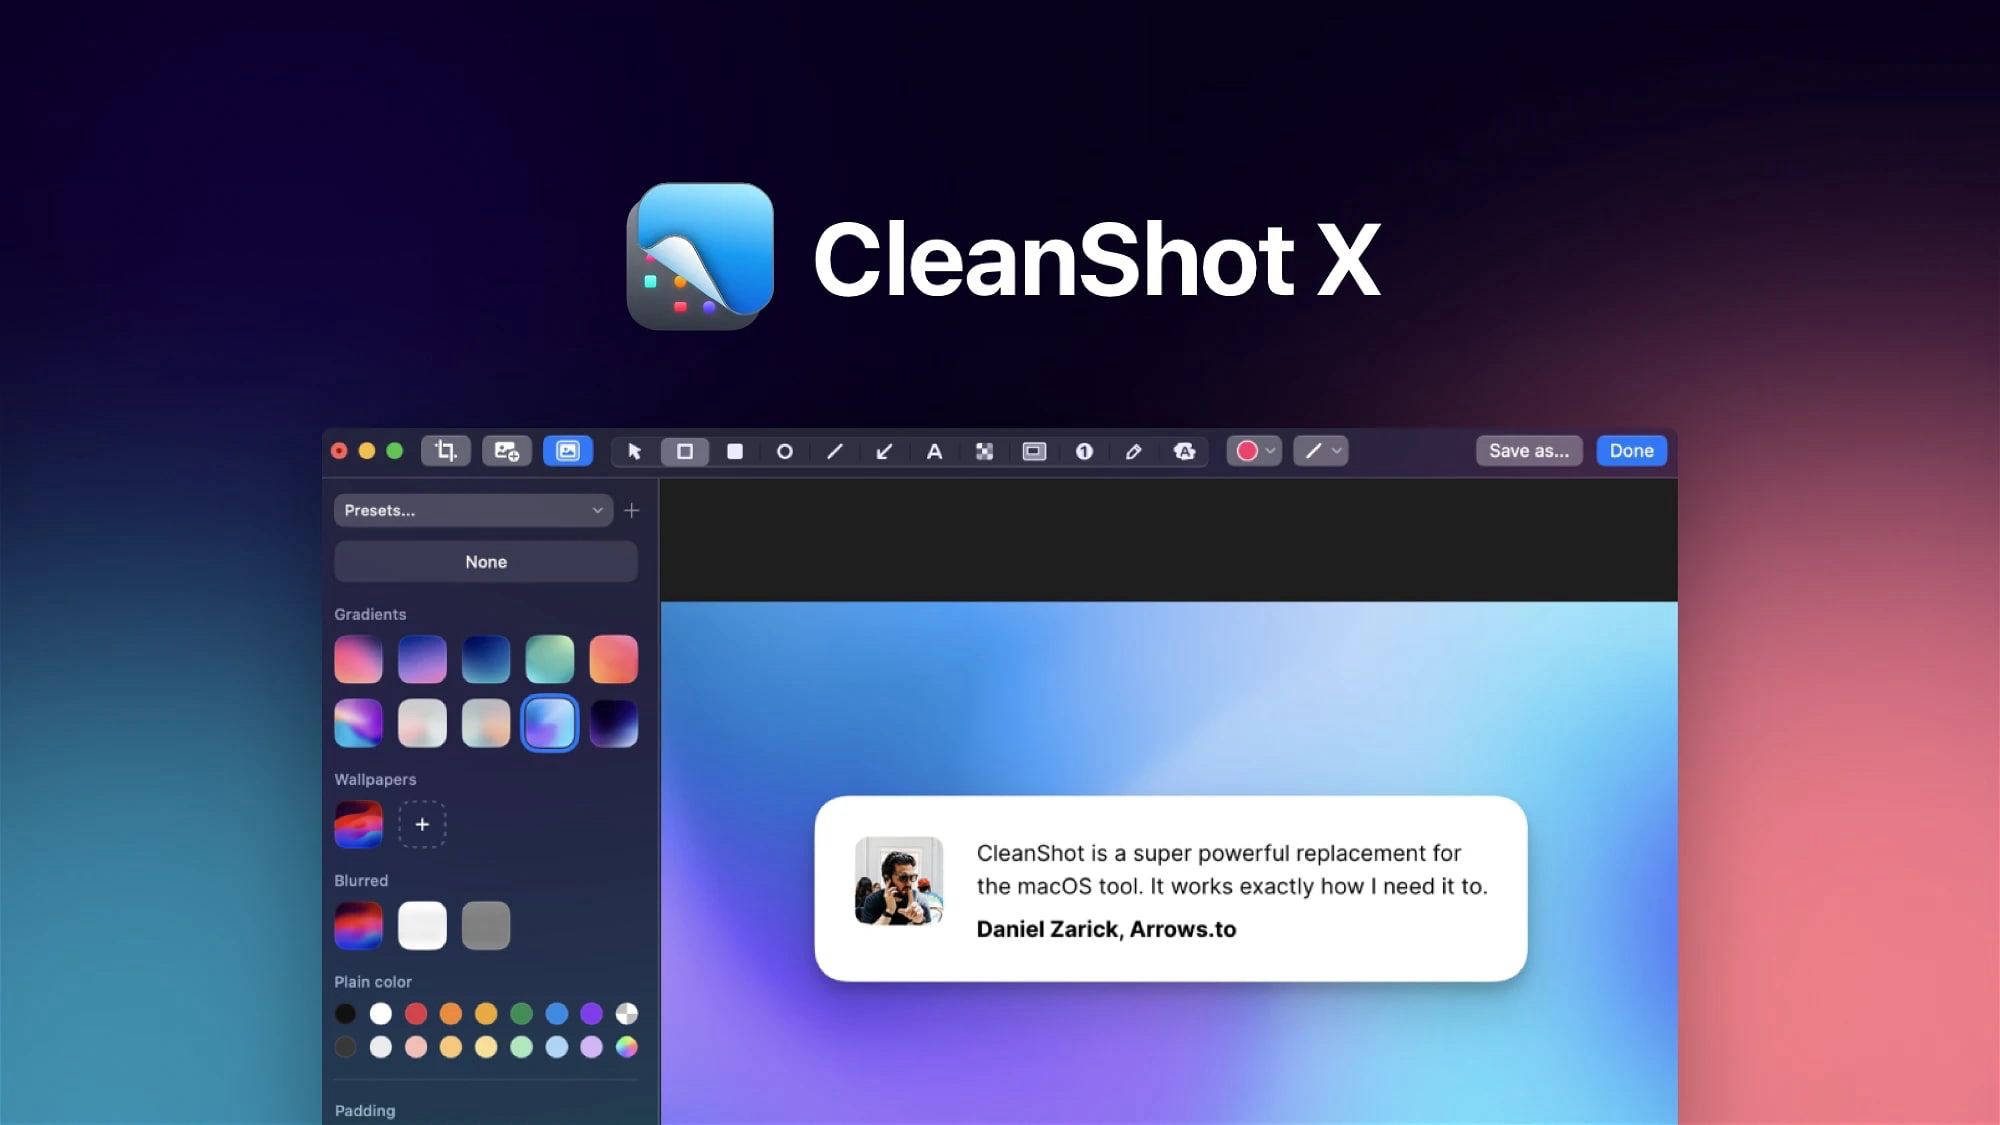
CleanShot (CleanShot X)
Overview
CleanShot X is often lauded as a “super‑power screenshot + recording” tool for macOS.
It lets you hide desktop icons, choose background styles, scroll capture, video capture, and more.
| Feature | CleanShot X |
|---|---|
| Price | One‑time USD 29 (includes one year of updates). Optionally renew for USD 19/year. |
| Platforms | macOS only |
| Public Link Sharing | Built-in CleanShot Cloud upload: get a shareable link. |
| Ease of Use | Very smooth. After capture, a floating quick-access overlay appears. |
| Customization | High. Choose backgrounds, hide icons, padding, shadows, window styles. |
| Supported Formats | PNG, JPG, GIF, MOV |
| Best Suited For | Power users, integrated screenshot + video + sharing + annotation. |
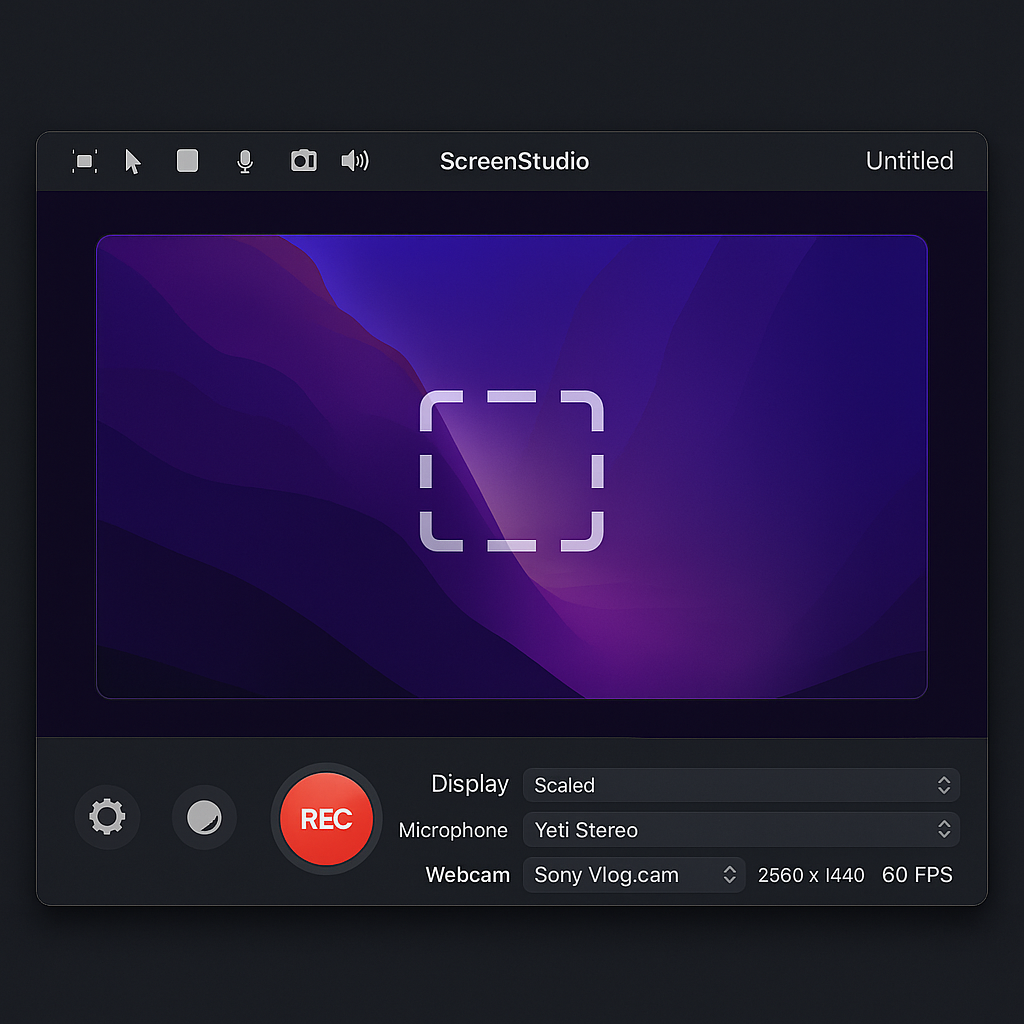
ScreenStudio
Overview
ScreenStudio is more video-oriented, primarily a screen recording tool.
| Feature | ScreenStudio |
|---|---|
| Price | Paid (check site) |
| Platforms | macOS (possibly cross-platform) |
| Public Link Sharing | Export/share manually |
| Ease of Use | Moderate |
| Customization | High for video |
| Supported Formats | MP4, MOV, GIF |
| Best Suited For | Users focused on screen recording / tutorials. |
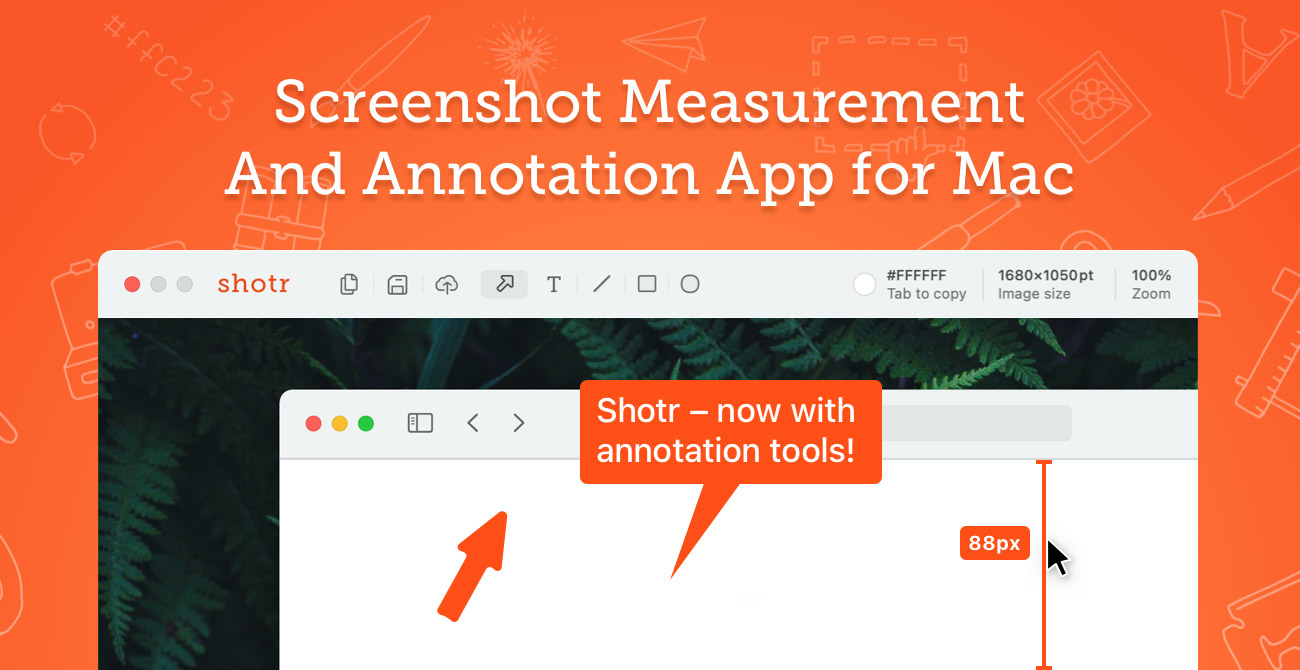
Shottr
Overview
Shottr is lightweight, fast, optimized for Apple Silicon, with annotation and scrolling capture.
| Feature | Shottr |
|---|---|
| Price | Paid |
| Platforms | macOS |
| Public Link Sharing | Yes |
| Ease of Use | Very fast, minimalist |
| Customization | Decent (annotation, backgrounds, shadows) |
| Supported Formats | PNG, JPG |
| Best Suited For | Fast, efficient screenshots with annotation. |
Lightshot
Overview
Lightshot is a minimal, cross-platform screenshot utility.
| Feature | Lightshot |
|---|---|
| Price | Free |
| Platforms | macOS, Windows |
| Public Link Sharing | Yes (via prnt.sc links) |
| Ease of Use | Very easy |
| Customization | Limited |
| Supported Formats | PNG, JPG |
| Best Suited For | Quick, free, no-frills screenshot + share. |
Xnapper
Overview
Xnapper emphasizes “beautiful screenshots instantly” with styling and OCR.
| Feature | Xnapper |
|---|---|
| Price | Paid |
| Platforms | macOS |
| Public Link Sharing | Supported |
| Ease of Use | Intuitive |
| Customization | Background gradients, blur, presets |
| Supported Formats | PNG, JPG |
| Best Suited For | Designers, bloggers wanting polished images. |
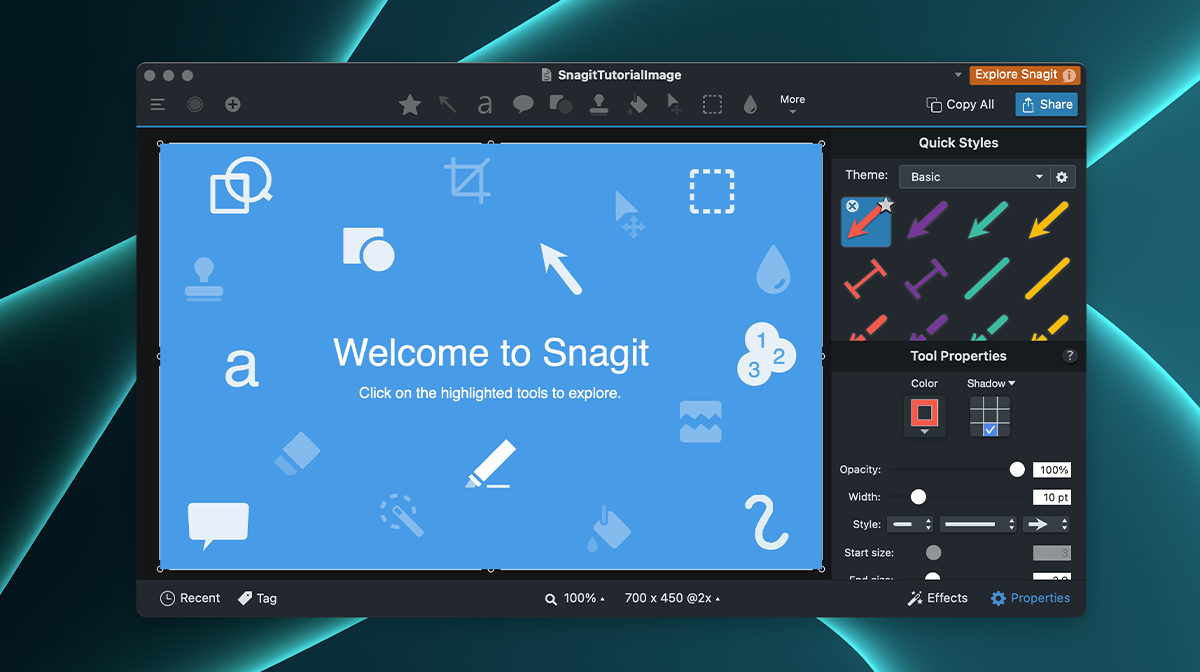
Snagit
Overview
Snagit is a veteran tool with powerful editing, templates, and effects.
| Feature | Snagit |
|---|---|
| Price | Paid (license) |
| Platforms | macOS, Windows |
| Public Link Sharing | Yes |
| Ease of Use | Moderate (learning curve) |
| Customization | Very high |
| Supported Formats | PNG, JPG, GIF, MP4 |
| Best Suited For | Professionals, technical writers, teams. |
5. Summary & Recommendations
- Best all-in-one: CleanShot X
- Fast + minimal: Shottr or Lightshot
- OCR & polished output: Xnapper
- Video / content creators: ScreenStudio or Snagit
- Cross-platform teams: Snagit